|
Basics II: Putting the Basics of Drawing
|
|
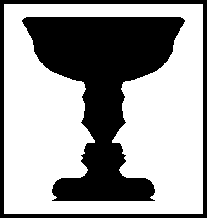
| Our Mission on this page And what are we going to do on this page? We're going to take a look at some basic drawing lessons that employ all those skills you read about on the first page. You can understand them in your head, but I want you to experience them. It's much more powerful that way. Expanding on those basic drawing skills: Here's the basic, king of them all example of "Drawing on the Right Side of the Brain": the old "Vase/Face" example. What's it good for? Well, as you do this, stare at it and see both a vase, then a face and then flip flop back and forth between the two, I want you to keep this idea in mind. Ask yourself "how does this feel, this switching back and forth between perceptions of vase and face?" What I'm asking is for you to "observer the observer". That is, even as you view the vase/face, employ a "third eye" or "third ear" to be on the lookout for changes in how what you're doing feels like. Be on the lookout for that instant when you can say "hey, I felt a switch there". It's very subtle, like trying to be aware of the moment you fall asleep - and like falling asleep, is easier to identify in retrospect. So go for it. Look at this picture and watch the magic take place:
Is it Vase or face? or vase, no face, blah! :-) What's going on here? That little shift, the one that allows you to switch between vase and face is actually a switch in modes - a switch in brain function. A complete shift. Some may say from left brain to right brain. Though the side of your brain the shifts takes place within is not nearly so clean cut, a definite shift actually takes place and is viewable with PET and CT x-ray technology. Blood actually flows to those parts of your brain. (And a large abundance of that blood flow, flows to identifiable places on the right side of your brain.) Pretty amazing if you ask me. For some, the switch was a little tough to control at first (it was for me anyway when I was first exposed to it.) And for many it causes an outright conflict. But that's your goal: to make the switch between those different brain modes - something you control rather than a random event. And how do you do that? With practice.
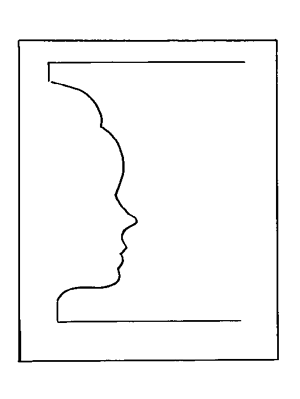
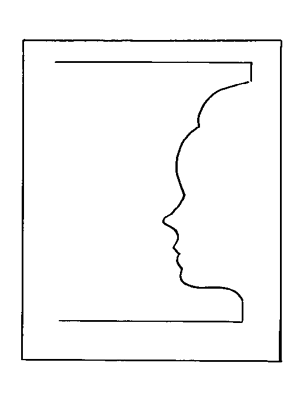
So here's your first exercise: completing the mirror image face (or the mirror image "other side of the vase" - whichever you might be perceiving at the moment). You could even try to do this by putting your finger on the screen and pretend draw the other half. The first picture is for right handed writers and the second is for lefties. And as you do this, you may even want to name out loud the parts of the pre-drawn face. Go right down the line-drawing naming out loud "hair, forehead, nose, lips, chin, neck" to further corner you in your language-based, analytic, abstracting left-brain. This is oversimplified here - there's still more to this. You can see Betty Edward's site by clicking on the button just below for more complete directions on the vase-face exercise:
The point of this exercise Again, the main point of this exercise is twofold 1) the short range goal to become aware of both the conflict and 2) know that you can control this. (In Lessons One and Two of the YouCanDraw.com e-book there are over 30 exercises, explained and detailed in deep depth, so you can get a lots of practice at this if you want.)
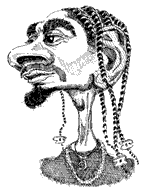
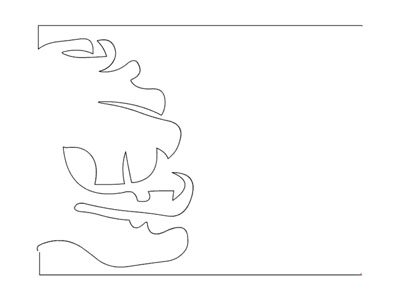
When you feel like you can draw the simpler vase-faces, it's time to step it up to the more complicated faces like the following, complex "monster" face. The directions are exactly the same: draw the mirror image. Yes, it's a lot more involved but if you could do the one's above, you can do this one. Click on the button below for a bigger, printable, monster face (if you're left handed, just flip the following picture so that the pre-drawn half is on your right):
Use the exact same techniques you used in drawing the simpler face above to draw this
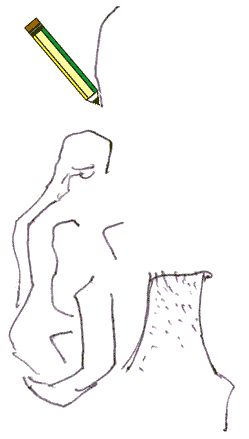
Seeing proof you really can draw: upside-down drawing The next exercise - and probably the most amazing step for those of you with little or no drawing background is this one: the upside-down drawing exercise. Why is it so amazing? Because even if you thought you had no drawing skills whatsoever, you might well surprise yourself that you DO have skills there beyond your wildest expectation. And what a neat surprise would that be? At first glance can you tell what this picture is? You'll figure out part of it pretty easily I imagine, but it won't make sense to you in it's entirety unless you either do the exercise yourself or click here for the "correct orientation" of the picture - but I challenge you, don't spoil it for yourself. Do the exercise first. What's the exercise? Draw a rectangle in approximately the same shape as the rectangle surrounding the following picture. Duplicate exactly what you see in the picture within your pre-drawn rectangle (you can skip drawing the pencil :-) . Try to resist flipping your picture over until you're finished. You're in for a sweet surprise. I'll explain why this works so beautifully in a second - after you do this first exercise and a couple more examples.
Making the familiar unfamiliar and paradoxically making it
A little more understandable? It's a pair of block/contour
The classic example used in teaching upside-down drawing - at least among those who practice Betty Edward's "Drawing on the Right Side of the Brain" techniques - is that of Picasso's Igor Stravinsky. You can see it at either of the following sites. I highly recommend printing it out, (or right mouse click over the picture and pick "save picture as" from the pop-up window). Then after you print it out, turn it upside-down and draw it from top to bottom - literally from top to bottom (top to bottom as it sits there on your drawing table upside-down, so you'd really be starting at the feet...because it's upside-down. Got it now? :-). There's two links here just in case one won't open.
Here's a good sized Stravinsky picture: (http://192.80.61.159/HTML/Academic/history/HI14Net/Unit_6.html)
And here's a huge picture (http://www.geocities.com/picasso0408/stravins.html):
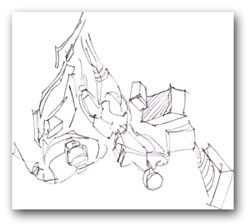
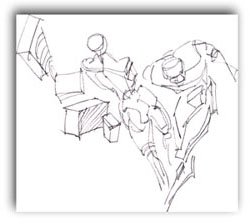
If you're feeling adventurous, try drawing this much more complicated cowboy drawing as you see here on your screen:
For the adventurous - try drawing this picture - it gets complicated :-)
Why does this work? Because flipping any picture upside down makes the normally familiar parts (like hands, wrinkly pants, the face etc.), into something unfamiliar. And why is this good? Because, if the dominant left brain gets tired of trying to figure out what the heck is going on, it'll abandon the task. At that point your right brain (or that mode of your brain that has direct access to your senses) takes over and can do what it does best: it sees exactly what's there. Consequently, it makes using all those skills you saw on the "drawing basics" page that much more employable. But, you don't have to use any of those skills in order to make a giant leap in the realism of your drawings -- you can do that by just flipping the picture upside-down and drawing what you see.
Pure Contour: getting lulled deep into your artistic brain Now here's some another really fun exercise. It's called pure contour drawing. Pure contour drawing is probably the one exercise that pulls you deeper into the artistic mode of your brain more so than any other drawing exercise.
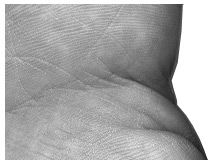
How's this work? Back in grade school, high school and even in college, drawing teachers always had us do some version of this exercise - but I don't think even they knew what the real outcome of this exercise was supposed to be. According to to the instructions given then, you were supposed to be able to draw a perfect likeness (or a good likeness anyway) of whatever you were drawing by never taking your eyes off it (it being whatever it was you were drawing). That is, by staring at your subject and NEVER looking at the paper you were drawing on, you were somehow supposed to draw a complete, proportional, to-scale reproduction. How often would this work? Like never. And if anyone did do a decent similarity, you knew they were cheating. I now have a whole new understanding of this exercise - and it's powerful. The point of it - as I understand it now - is to pull you deep into your observing brain. So deep in fact, you forget about time, you forget about your problems, you even forget about your anxiety around drawing. The end result, the drawing part of the deal, the actual pencil lines you left on the page, become secondary but have a sort of surreal freshness to them you just can't fake. I'm going to take you on a little "pure contour" ride right now. Check out this close-up of a portion of a hand (there's lots of detail there):
Squint Squint your eyes as you look at this picture. When you squint, you collapse a majority of that detail. You might become aware of the overall shape of the hand as it rests within it's format ( you remember "format", right?). And in this particular snapshot you might see two or three shadowy looking areas that represent two of the biggest skin creases and the area of the hand on the right side of the picture where it's nudging up against the white negative space on the right. (Remember "negative space" or "non-object space"?)
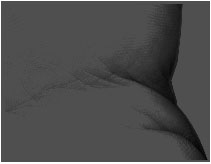
Open your eyes just a little and you can start to see the next level of detail - where you see some hatch-lke diagonal lines formed by the creases:
Opening your squinted eyes a little more
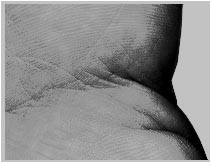
Open your squinted eyes yet a little more and you might start noticing the little splotchy areas, the mottled areas where different amounts of blood flow within the skin (this was caused by the pressure of placing the hand on the scanner glass):
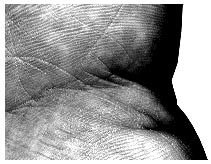
Accentuated to show off splotches and fingerprints Now open you eyes all the way and you start noticing whorls and fingerprint type skin ridges there in your palm - the exact same kind you see in a police inking, completely unique to you and your hand. Now look at you own hand under some really good lighting and go through the same process. I'll bet you'll see all sorts of details there you've never paid attention to before.
Want to try the pure contour exercise for yourself? To do this exercise justice, here's what you do. Get:
(I like those kitchen timer spring-loaded wind-up types.)
Then:
Turn yourself away from your drawing paper: don't look at it!
Move your eyes and your drawing hand at the same time
Repeat: eyes move and hand draws simultaneously OK, make another little move with your eyes, and again, move your pencil, i.e. draw that little bit you just observed. Sooner or later you'll come across one of the large creases in your palm. What did Yogi Berra say years ago? "When you come to a fork in the road, take it!" And you'll find many forks in the creases in your palm. Just keep doing the same kind of incremental observations, and mimic what you see on the drawing paper. There'll be lots of little starts and stops, sudden changes of direction, both in what you see and then in what you'll record on the paper. That's exactly how it's supposed to go. No need to worry about results - it'll take care of itself! The last thing you're not to worry about is if your final drawing will look like anything on your hand. Don't worry, it won't - it's not supposed to. Your job... Your job is to keep moving your eyes around your hand and recording all the little jerks and creases and sudden changes of direction. Let yourself follow every little thing you see - and keep recording. You'll find yourself very deep into "the zone" in no time. When that timer "dings" you'll probably want to keep right on drawing. And do so but not more than 5 or 10 more minutes. The same way you don't want to start off jogging by running a marathon, you don't want to overdo these first exercises. I want you to say excited about drawing. Keep your drawing hand on the paper Oh, and one last thing - don't lift your hand off the drawing paper. If your eyes make a jump, or you come to a dead end in a skin crease and you have to back your way out, just let your pencil record this. This'll add to the amazing texture of your drawing.
If you just can's keep your eyes of your paper, or if you're tempted to steal looks at your drawing paper before the 30 minutes is up, let me suggest putting both your drawing hand and taping your drawing paper inside a big paper bag - that way it'll be a lot harder to steal looks at your drawing. Sign and date your drawing when it's done - you want to keep a written record of your progress. Done? Now look at your paper. I guarantee you'll be at least a little bit flabbergasted by the results. And I'll bet it's interesting in a way you never expected. I'll also bet you found very definite areas within your drawing you could recognize as parts of your hand - so you were actually doing realistic drawings in a most creative and honest way.
Here's an example of a pure contour
Seeing your hand like this, slowing down to take in all that detail, will make your very own hand something foreign to your brain. You're looking at it in a way you never have before. And you'll be amazed by what you can draw once you make what you draw - whatever it is - unfamiliar to your eye. And how do you do that? Well, the same ways we're showing you here: by getting deeply involved with your subject and not worrying about how your drawings will look. If you want to see a much more in-depth explanation and demonstration, complete with animations and a whole bunch more illustrations and exercises, you can find them in Lesson 4 of the YouCanDraw.com e-book. How do I know? I wrote it :-)
Tightening things up: Modified pure contour In the step above, where you got deeply involved with your hand, the object of the exercise was to give you an experience of deep observation. It was to give you an experience of being pretty much lost "in the moment" as they say, in your artistic, observational brain. Pure observation was the goal. Accuracy was secondary. And that brings us to the next step: modified pure contour. Modified pure contour is this: adding the simple step of going back and forth between what you're observing and your drawing paper. That's all. And in so doing, you bring in those other things we spoke about on the Drawing basics page. Things like sighting, and reckoning angles and applying formats. All those now will make so much more sense after you've learned how to enter deeply into your observational brain - your "right brain".
Getting tons more accuracy into your drawings: On that first page we talked about formats, the viewfinder, shadows and highlights, and reckoning angles. (Remember the viewfinder and the format need to be proportional.) All of those offer big help in drawing accurately. But there's a shortcoming in just using one big outlining format in your drawing: if what you're drawing is really big or really involved, or just plain over challenging, it might not help enough. But there is a trick...
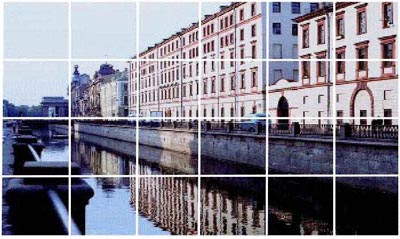
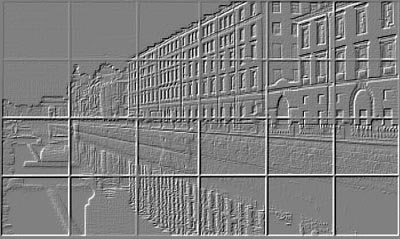
The trick? Break up your picture with "mini-formats" or guides What will help you break up a really involved picture? Here's the answer: a broken up format. "Broken up" is one way to describe it, but a "subdivided" format is a more accurate way to put it. And "subdivided" sounds pretty academic. The core of the skill is analogous to this: a hunter will add cross-hairs to make his hunting scope even more accurate (and our hunter here is just hunting for pictures :-). What cross-hairs really do is break up the view. In that same way, adding cross-hairs to your viewfinder and then reproducing them on your drawing paper allows you to do the exact same thing. And though cross-hairs break your drawing up into just four squares, you can go way beyond that. You can break up your viewfinder and your drawing paper with a whole bunch of "crosshairs". So now you're looking at like say, 20 smaller, manageable areas within your subject. Each square now very reproducible. That was an abstract explanation. Let's look at an example You could pretend you're viewing this Amsterdam canal scene (I thinks it's in Amsterdam :-)), through a giant picture window with all sorts of smaller windows and window panes built into it:
Now just imagine you have a drawing paper with those exact same lines pre-drawn lines on it, all drawn in the same proportion and intervals. Your job would now be to draw all those smaller sub-pictures within the overall larger surrounding format, treating each window as it's own format. Then you can go through your picture one square at a time making all those reckonings and measurements and sightings (using all those skills we talked about on the first "Drawing Basics"page) on each manageable section. Does that make sense? (Did you notice a secondary phenomenon going on here too? The lines breaking up the pictures are parallel both vertically and horizontally, even though they might look a little bit crooked. You can see the exact same patterned paper just below and it's alot easier to tell all the lines are vertical and horizontal.) Like to try drawing this little scene yourself? Click on the button below to print out this cross-lined paper (which is really a paper subdivided into some 20+ mini-formats) and draw the next picture on it:
For a full-size version of this pre-gridded format, click on the following button:
The next picture you're about to see is the same Amsterdam Canal scene - but it's been retouched to remove all the extraneous detail and so it'll be easier to draw. (Click on the button below to print out a simplified version of this canal scene you can draw inside the pre-gridded format you printed out) :
Click on the button below to print out a retouched version of this canal scene you
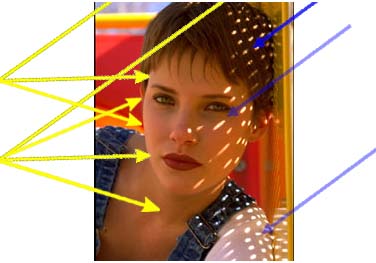
And to really take the final step: The last skill mentioned on the drawing basics page was the skill of deciphering highlights, shadow, and tones and shades. We mentioned there diving right into color is too much to start with. Beginning with tones and shades of gray is the best place to begin. After mastering grayscale, you can work your way up to color. In the following color photo, light is coming from all sorts of directions. There's direct sunlight coming through the window she's leaning against, there's reflected light coming from an unseen wall hitting the left side of her face, and there's shadows - some very subtle - weaving their way into all this light. Here's the color photo:
Can you tell the direct light apart from the The next picture you're about to see shows both reflected and direct light. Scan closely around the picture - squinting will help - and look for areas that are just a little bit brighter than the shadows around them. Most of these areas of reflected light will be on the left side of the features. Why? because features like the nose stick out just a little bit to catch that light or, in areas like the cheek, just plane face the direction the light is coming from.
The blue arrows represent the direct light and the yellow arrows represent a few areas
|


| Note: If a new screen doesn't open on your computer monitor, click on the last Internet Explorer or Netscape mini-icon on the right at the very bottom of your computer screen. This should pop the new browser back up to the top. If that doesn't work, click on all of the browser icons one at a time along the bottom of your screen until you see the correct picture pop up. And you'll know which one that is. Go right down the row and click on these: |

For the big version you can print out click on the button
below (and when you get there, click on "file" at the top
left of the tool bar on the pop-up page and scroll
down to "print".)
Click on the button below to bring up the window where you can see and print out the empty grid pattern - custom made for you to draw the model face. (Click on "file" at the top left of the tool bar on the pop-up page and scroll down to "print".)
Click on"empty grid" button below to bring up the window
where you can see and print out the grid pattern just like
you see above. (Click on "file" at the top left of the tool
bar on the pop-up page and scroll down to "print".)
Applying what you've been shown
Now that you've worked your way through the two basics of drawing pages, you really do have at least a conceptual idea of how you can really draw great reproductions.
There's a really fun drawing program out there on the web - different than the YouCanDraw.com program - that builds right on top of what you've been shown in this last section (where you draw "grayscale" or black and white pictures on pre-made grids). I bought this product about a year ago and found it to be a great "jump-start" allowing people to make great drawings from photos with little or no drawing background. You can see it at ArtSkills.com (Click on the button just below).
The program doesn't talk overtly about the skills of drawing per se, but you get the gratification of actually making very recognizable reproductions rapidly. It's a fun program.
For real mastery
But to really master drawing faces and caricatures there's more to it than that. You really need to master all those skills we've talked about here. You've got learn about anatomy, and how light and shadow work on the face in a more intimate way. You need to learn to see beneath the surface and recognize what's taking place literally under the skin. You need repetition and practice, practice, practice. (I know, that kind of threw a wet blanket on your enthusiasm. But it's true: practice really is the key.).
But you can really accelerate your progress with a good teacher - or a program that spoonfeeds you assignments, gives you tons of detailed explanations, delivers lots of interactive learning aids, and exercises that cut through to the really important part of each lesson. You need to apply all this "basic" stuff to each area of drawing and in particular to the art of drawing faces and caricatures. Does such a program really exist? Yes. And you can see it at YouCanDraw.com.
And after that little unabashed sales schpeel, our next step at this site is to show you the next two sections you need to master in order to become a truly great portrait or caricature artist: drawing the head and features. ( back to top )
| Like to see an even more in-depth evaluation of a Like to return to the Drawing Basics page? Click here Like to go back to Home page? Click here
To see a 1000+ page electronic book dedicated to teaching caricatures ( back to top ) |