| 
The third - and most difficult skill
(back to top)
3) Recognizing Proportions, Perspective, Scale and Angles.
Have you ever heard farmers or horse traders talk about a horse's height? If so, maybe you've heard them say something like "yea, he's a big one. Stands 14 hands high at the shoulder".
It's a way they've developed to talk about dimension. And by 14 hands tall they literally mean 14 "hands" - 14 human hands high, lined up palm to fingertips to palm - 14 times. So a hand is their unit of measure, just like the old English kings "foot" was literally the length of the kings foot. We still use that today. And of course there's the artists thumb. What all of these have in common is that they're some kind of convenient ruler that's fairly constant and tough to lose. (Well harder to lose than a ruler anyway.) And some kind of rule is our stepping stone into proportion.
And that's what this third skill is about: using something convenient, constant and relatable (therefore proportionate) to the task at hand. When you see an artist with his arm fully extended, sighting down it like a hunter would aim down a rifle barrel, he's not admiring his thumb.
He's asking this question: "how big is this part of the picture compared to my thumb or this pencil?" Once he's got a feel for "how many thumbs away the armrest is from the back rest, and how many pencil sections long the chair legs are", he can accurately reconstruct what he's sees in the real world in front of him on to his drawing board and paper in those terms. Does that kind of make sense? Let's walk through an example.
Applying this to the chair example
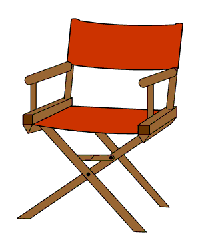
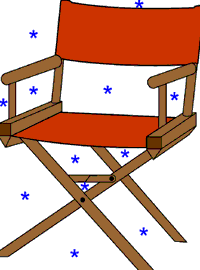
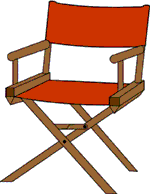
Remember the chair example above? All those triangles and squares that make up the white space exist in a relationship to one another. Our job next is to figure out what that relationship is.
Here's a ruler:
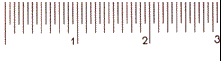
Here's a ruler - we'll use it for "sighting"
Here's our chair and the ruler stuck right inside the picture with it:
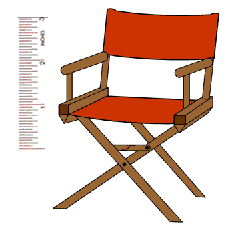
We're gonna relate the chair to the ruler. (The ruler by the way, is about 3 inches long but we'll forget about the 'inches' part and just substitute "units" in it's place...also, it's hard to read the "1,2,3", but they're there.)
To recap, we're going to put in terms of those units all the important parts of the chair. In that way we'll be "relating" the chair to the ruler.
Let's dive in. To start, the rectangle under the armrest, right at it's frontmost edge is about is about 1/2 a unit tall (see the little black lines between the chair and the ruler?):

On to the backrest. The backrest is about one unit tall:
and it's a little more than 2 and 1/2 units wide:
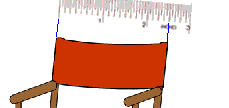
And this leg in the front is over three units long - give or take a little depending on which edge of the leg you're measuring:
And you would continue like that to go around measuring the other parts of the chair or whatever it is you're drawing in the same methodical way.
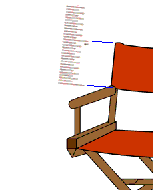
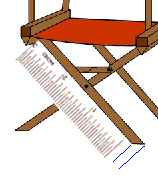
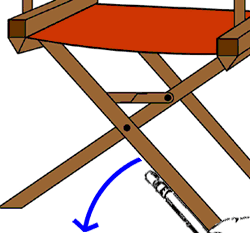
Try this for fun: can you estimate the length of this little section of leg that's intersected by the hinge bracket and marked with blue?:
(My guess is that it's about 3/4 or so units. Maybe a little more. Do you agree?)
Sighting
(back to top)
This sizing-up technique is called "Sighting". And it's just an artist's word for visually reckoning and measuring the objects of your drawings. It's a key skill you need to learn to get a feel for proportion.
Two things to remember when sighting
There are two things you need to remember when sighting. First, you can use any kind of measuring aid (like the ruler in this case) to size up your subject. But secondly, to keep your measurements consistent, your measuring tool must be consistent.
If you used a ruler like we did above, lot's of artist's will hold it (or their pencil, or their thumb), at an arm's length. Why an arms length? Because an arm's length is pretty easy to duplicate - your arm doesn't change a whole lot in it's length during the time it takes you to draw a picture or during your adult life. So it's pretty consistent.
But it's not important that your measuring device (the pencil or a ruler or your thumb), are always an arm length away - so long as your measuring device is always the same distance from your eye during the course of drawing that picture. But it's just easier to maintain that whole apparatus (your arm, and eye, and pencil, ruler, etc.) and the distances between them consistently with your elbow straight and your arm fully extended.
Why keep all those distances the same? Because the perceived proportion of the ruler changes with the changing distances. If our "three unit ruler" is actually three inches long, it won't appear to be a consistent three inches if we keep changing how far away it is from our eye as we compare it to objects out there in space*.
(*It'll remain consistent within itself - that is, in our ruler example each unit will stay proportionately the same size in relation to the other 'one unit' sections within it. But each ruler at different distances from your eye will - to your brain - be a different perceived size. The difference will be one of scale, not proportion.)
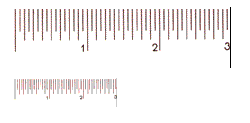
Here's two rulers of identical proportion but different scale -
the one on top was duplicated and shrunk in PhotoShop to
make the little one on the bottom; they're both made of three
equivalent sections, they're the exact same ruler and
are thus proportionate :-)
Experiment
Try this: hold your right thumb about 5 inches in front of your right eye. (Close your left eye.). Your thumb looks pretty big, right? Now, straighten your right arm out so now your thumb is an arm's length from your eye. Which is bigger? Simple, right? When your thumb is right in your face, it looks a whole lot bigger.
A simple concept - things look smaller with distance
Now it may seem ridiculous to make any big deal out of that little natural common sense phenomena - that when something is farther away it looks smaller. This simple idea is at the core of the concept of Proportion: that to make consistent measurements out there in the world, our measuring device must be consistent in size.
Drawing a jet
Here's how this simple idea will work out in the world. There's a plane in the picture just below. It's huge! See how it dwarfs even the clouds it's passing behind? It's got to be at least a thousand feet long. Maybe two!
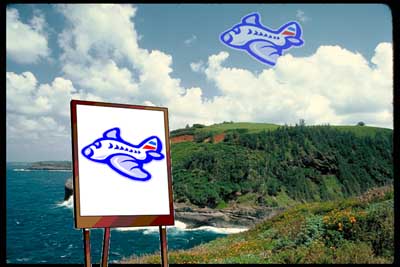
Look at our drawing board there. Let's pretend you've drawn the plane on the drawing board. Now tell me, which plane is bigger: the thousand foot long one that's behind the clouds in the sky, or the one that's on the 17" x 24" drawing pad on the drawing board? Is this starting to sound like one of those trick questions? Well it kind of is. But you tell me which is bigger first - as it rests right there on your screen. Then I'll tell you about the illusion at work in this picture.
-------------
OK. Are you back? The one in the sky sure looks bigger, right? But did you use a ruler or your thumb to measure them?
Instinctively you know the plane - if you were actually standing in that scene - would be hundreds even thousands of times bigger than the drawing. There's enough clues in the environment to tell you that (the hills, the clouds, etc.).
And your brain has trained itself to adjust for size at a distance. That's the illusion part at work there: the brain's enhancement and conjuring of new facts that really aren't there: the plane in the sky looks bigger than the plane on the paper. (But if the brain didn't do this we'd be getting hurt a lot more often.)
But as the two planes appear - as they rest on your computer screen - they're the exact same size. Hard to believe? Check this out:
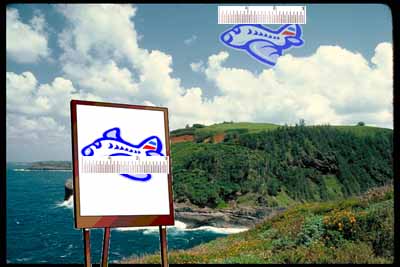
The planes are actually the exact same size
In the above picture I've added our good old ruler. You can see they're the same size. ("Sighting" reminder: as you stood in this picture drawing the plane, you were holding your ruler with your outstretched arm so it was always the same distance from your eye :-).
Learning to appreciate what the senses are quite accurately telling the brain, without allowing the brain to influence or distort that info is a big stumbling block to beginning artists.
Back to sighting
Again, if you were in this scene trying to draw the plane, you'd have to have a way of drawing it to scale (that is, proportionately) on your paper. And that's where sighting - the artist's "thumb thing", or using the ruler above - comes back in so handily.
To maintain those proportions, sighting further allows you to make statements like "the tail of the plane is one fourth the length of the whole plane, and it's front wing is half as long as the entire plane when you measure it from fuselage to wing tip...", those kinds of things. So whether the plane is in the sky or you're drawing it on three different sized papers, you can duplicate it accurately using those kinds of reckonings and proportions. Does this make sense?
Perspective
(back to top)
"Perspective" is the area of art where you concern yourself with how an object appears as you view it from different angles and distances. For instance, if you look at a wheel directly from the side, it truly looks like a circle. But if you turn the wheel and you don't move, it starts looking more oval, like the wheels on this crazy motocrosser's motorcycle :
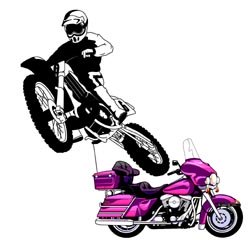
Your brain interprets the wheel as a circle even though the visual information coming through your eye says the wheels are turned and so now appear "oval". And like I said above, that's part of the glitch in drawing: drawing what you "know" to be true about something (the wheel being a circle), getting in the way of the sensory information coming in through, in this case, your eyes (the senses telling you a wheel viewed from any direction other than straight on will be oval).
Foreshortening
(back to top)
This distortion phenomenon is also known as "foreshortening". It's still under the general umbrella of 'proportion'. I'll illustrate: if you were looking at the same motocrosser above with his motorcycle in the same orientation as the big purple Harley-Davidson Electroglide behind it, it'd look longer than it does above. In the picture above, the whole airborne motorcycle is rotated and twisted in space, and so appears "foreshortened".
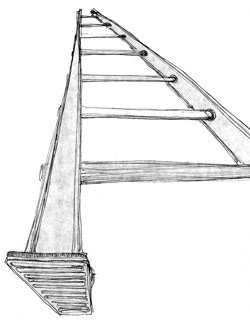
A 6 foot ladder
A 6 foot ladder
One more example of foreshortening. Here's a 6 foot ladder. Does it look 6 feet long? Maybe so, but you're looking at it with one end right next to your eye and so it looks like it's narrowing at it's far end. The brain however adjusts for the change in perspective. Plus you know the 6 foot ladder is made of two parallel 6 foot rails connected by a bunch of rungs between the two rails. You don't have to say "hey that's a foreshortened ladder", the picture just makes sense to our brains.
However, come time to draw it, you have to do your "sightings" and make measurements in order to draw it accurately - which again may cause a bit of a battle between your brain and what your senses are telling it. Why? Because your brain knows the two ends of the ladder are similar in width, but your senses are telling you that when viewed like they're viewed in the picture just above, one end is perceived as a whole lot wider. Make sense?
Sharpening up realistic drawings: two techniques - formatting and angle reckoning
(back to top)
Which brings up the last two techniques: 1) formatting and 2) reckoning angles. (I told you this third skill was an involved skill :-)
Let's take formatting first. We already touched on it above. It's another trick you can use to increase the accuracy of your drawings and maintain proportion and perspective. Plus we can go through it pretty fast.
What's a format? It's the frame or bounding border around a picture. Look around your house. All your paintings are framed, right? The frame's the format. Or your TV? It has the box built around the tube - that's a form of formatting also. That's all it is. It's a frame.
Back to the chair example above. Remember I casually mentioned a camera's viewfinder above? When you look through a camera's viewfinder, you're looking through a rectangle of sorts. And the paper you draw your drawings on are rectangular in shape (for the most part), right? Those again are both instances of "formatting": They both put a frame around our subject. Now let's make a connection the two - between the drawing paper and the viewfinder.
By "connection" I mean let's make the paper you draw on exactly proportionate to the rectangular shape of the viewfinder.
So if your viewfinder gave you a view of 1 inch tall by 2 inches wide, then any paper, if it was proportionate to the viewfinder, could be 1 inch tall by 2 inches wide (not too practical for drawing), or five inches tall by ten inches wide, or one foot tall by two feet wide. Each size paper is proportionately the same as the viewfinder. Follow me so far?
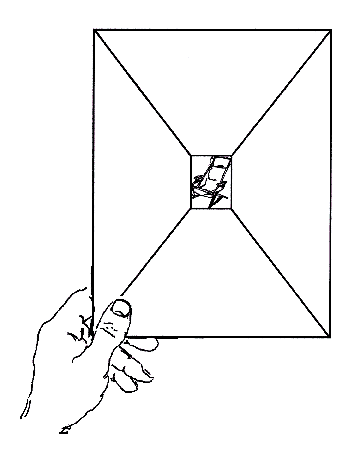
Where's that chair? OK, now let's for the sake of argument, assume the rectangular shape around the chair was exactly the same shape as the viewfinder in our imaginary camera. In fact let's assume when you look through the camera's viewfinder this is what you see:
The border around the chair is the
border of the viewfinder you're
viewing it through
Seem artificial? Well here's the technique: you get to take control. Look at whatever you're drawing through a pre-cut viewfinder! Then just make sure your paper, the paper you're drawing on, is the exact same shape and proportion of the viewfinder you made.
To duplicate this at home:
- take an 8 and 1/2" by 11" piece of cardboard, and,
- snip a rectangle out of it, (this is now your "viewfinder"),
- which you can view your subject through,
- and you could lay that same piece of cardboard you just cut the hole out of ( which is now your viewfinder), and lay it on a piece of paper, and
- trace that same rectangular shape - which leaves you with, voila, a format drawn on your drawing paper of the exact same shape as you viewfinder.
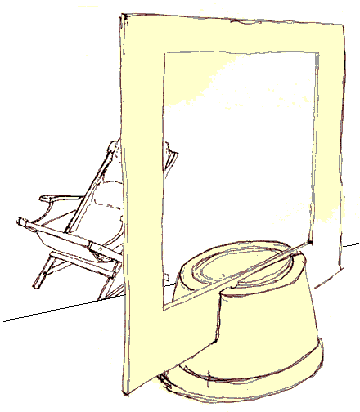
Here's a big viewfinder stuck in a Styrofoam cup - pretend we're
going to draw the chair as we see it through the viewfinder
Now like I said above, the viewfinder can be any size. The one just above is pretty big, and it's anchored in a Styrofoam cup. This way you don't have to hold it with your hand. Anchoring your viewfinder is important because you want to be able to see the same object at the same distance from your eye and keep whatever object you're drawing in the same place within the viewfinder as you view through the viewfinder. Check out this mini viewfinder:
What's all this viewfinder business allow you to do? It allows you to duplicate exactly both the proportion, and the negative shapes around the chair (or whatever object it was you were drawing - remember "negative shapes from above? The shapes that literally "thin air" formed around and within the chair?).
If you do your sightings with a ruler or your thumb and duplicate your findings right on your formatted paper, you're ten steps ahead of the competition in making a really believable drawing.
An important detail to remember
One last detail about using viewfinders. If you're taking a picture with a camera and you move the camera while taking the picture, what do you get? You get a blurred picture.
When drawing while using a viewfinder, it's really important to keep your head, the viewfinder, and the object all the same distances and in the same spots while you draw. Otherwise, the proportions change and the negative spaces around the object as you view it through the viewfinder will change and you won't be able to "sight" them accurately and consistently. Make sense?
Reckoning angles
(back to top)
And guess what else? Now that you have a format around your chair and on your drawing paper, you now also have both vertical and horizontal lines to gauge the angles of all the lines and edges that exist within the picture. (These new found vertical and horizontal guides are the horizontal and vertical borders of both the formatted drawing paper and the viewfinder.)
Like this chair leg:
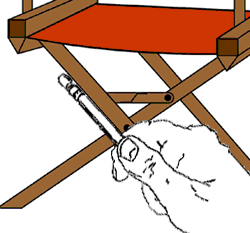
Lining up your sighting tool with a part of the chair (in
this case we're using a pencil)
We're sighting the angle of the chair leg starting like this first: by lining up a pencil with the chair leg. After doing this, you ask "what angle does this form with either the horizontal or vertical border of the format?" After you answer that question, you can go and draw it on your formatted paper.
Then you move the pencil down the part you're sighting to a point where it intersects a part of the format, in this case the horizontal border.
Sighting the angle made between the chair leg and
the horizontal border of the format
Finishing our sighting - note the position of the pencil?
Now form that angle between the chair leg and the format
in your head and envision it as you draw this angle on
your formatted drawing paper
Doing the same kind of sighting on a different part of
the chair: measuring the angle formed between the
chair leg and the vertical border of the format
Now, since both the angle the border of that arm makes with your viewfinder will be the same as the angle it forms with the vertical line of your formatted paper, you can accurately reproduce it. Pretty neat I would say :-).
What's left? Now you just work your way around the picture sighting all these things we just discussed. You sight the dimensions of each little part of the object, you sight and measure and compare the negative spaces. You reckon the angles the different parts form with the borders of the format that you've imposed on your drawing. (Which you've done with both the viewfinder and on your formatted drawing paper, which even if it wasn't the same size as your viewfinder was proportionate to it. This ensures accuracy.)
Summing up the third skill
You learned about proportion and foreshortening, we touched on the trouble spot of drawing where the brain wants to impose itself over the senses. You learned about "sighting" as an antidote to the brain's distorting influences - as a way to use your senses to relating the overall relationships of different parts of the chair (or any subject). Then we expanded sighting to include measuring of angles, finding that all these parts formed angles with the format (and each other). Those are powerful new reckoning tools that can really help you make a leap in your drawing.
Whew! Give yourself a hand for sticking through all of that :-).

The Fourth Skill: Judging Light and Dark
(back to top)
I'm going to whisk through this one. (Once you get through the first three skills, you'll already have a pretty firm foundation and it'll be a natural step going from those to judging black, white, and grays.)
So here they are. Photographer Ansel Adams devised a great way to judge light and dark in a picture or photograph. Rather than trying to look at the whole world, and wasting all your time trying to figure out how the light and color in any given picture compares to the whole blazing spectrum, narrow it down. That is, only worry about what's in your picture. And what's "in your picture"? What's "in your picture" is whatever's within the frame (or "format"). It's what's ever bounded by edges, the boundaries you put on it: like what you see through your camera viewfinder, or out your window. It's a finite area. I know, that's still pretty vague. (See skills 1,2, and 3 above).
Then ask these 3 questions:
1) Can I say what's the brightest part of the picture? It's the part that's getting the the most direct light. In a photograph the brightest white is the pure white of the paper it's printed on - so it could be sun on the water, or snow, or a street light reflecting off chrome. In the picture above, the sphere, it's the the gap on the upper left part of the sphere, the gap on the actual circle that marks the border of the sphere, (you know, the circle part of it). That's called the "Highlight", or "Direct light".
2) Can I identify what's darkest? What's the deepest gray or black in this picture? In the sphere above it's the "cast shadow", the oval that starts where the sphere seems to touch the ground, and runs off to the right. It's the part of any picture where the light's blocked. You'll find it in deep corners, dark alleys, caves, inside and underneath things.And the last question:
3) What's in-between black and white? What are the "middle tones"? On the sphere above, see the little gray crescent inside the black crescent? That's reflected light. It's light that's bouncing off other things right by the sphere. (And thought you don't see the other objects, they're suggested by reflected light.) If our eyes were sensitive enough, we could see that even the "Dark Side of the Moon" contains some reflected light. (It's just that a crescent moon is so bright, it overwhelms the grays of the dark side.) You can further divide mid-tones up into shades of "reflected light" and shades of "blocked light".
You use the exact same approach when dealing with color - but starting with judging blacks, grays and whites (known collectively as "grayscale"), will give you the foundation you need to make the move to color.
The fifth: the "Eureka", "I get it!" skill
(back to top)
| 
The big Eureka!
|
5) Putting it all Together. There's actually 2 things we're referring to here. You "put it all together" two different ways.
First, you integrate skills, you combine skills like the way you did when you learned how to drive a car. You learned signaling, the meaning of road signs, how to judge stopping, merging, accelerating, driving in the snow, etc..
|
Then one day you realized you could do those things automatically, without even thinking about them.
And second, you experience the "Eureka" effect first hand when you suddenly "get" something, when you grasp a concept, the way an insight rolls right through you when you have a sudden, full understanding, a "Gestalt". (The vase / face picture on the home page is just one example of this).
The first "eureka", the "integrating skills" eureka, is largely a result of practice. You didn't come to earth knowing how to speak, read or write. Right? When you learned to write, you first learned how to hold a pencil. Then you learned the alphabet. You learned what each letter looked like: a curve here, a dot there, straight lines crisscrossing.
You learned what the consonants and the vowels sounded like: the hard "K" of "Cat", the "fff" of fish, the long "O" of "charcoal". Then you learned how to write them, (actually draw them one letter at a time.) And you strung the letters together to form words, and you sounded them out by recalling the sound of the letters - until, little by little it all gelled in your brain: Voila! You discovered words, and then you recognized whole strings of letters as one word with a definite meaning and not a as grouping of letters. Then you progressed to reading. And writing.
You grouped a whole string of lesser skills into one powerful, wonderful skill, a larger more encompassing skill whose sum is greater than it's parts. A skill that you probably take entirely for granted now. And that's exactly what will happen as you get practice, gain depth, and master the 5 skills of drawing.
The second kind of gestalt is largely unconscious. It comes from years of being "out there" in the world. It's a direct result of how you've learned to perceive the world. Example: you're in New York and you see a guy with knife raised up in the air, wearing a voodoo mask and a hula skirt, running straight at you, you're gonna think your life is in danger, right? This nut's gonna kill you! Then you hear the director scream "Cut!!" Whew. You accidentally walked on to a movie set, but it sure felt real for a second, didn't it? (Course if you're in LA, you probably figured it was just movie set in the first place.)
The Shift is the Key
(back to top)
Until you heard the director screaming "Cut!" you had one interpretation of what you saw. It's when you made that shift, that instant you interpret one thing, then another, and then back to the original interpretation, that's when you literally feel a "shift" in your body and in your brain. That's a gestalt. That's similar to the "left to right shift" of drawing. (I quote "left to right shift" because the terms "left" and "right" are an oversimplified way of talking about different ways, modes, and capacities the brain can work in. But it'll work for now.)
Point is this: you already make similar "shifts" all day long. You probably never thought of them as being anything special.
When you master shifting from "left" to "right" brain skills consciously, that is, when you can make the shift at will, then you've taken a giant step in mastering the skills necessary to learn to draw. And now, seeing how simple (yet magical) it is, maybe you'll be willing to cut loose your desire to draw. Who knows, maybe you'll be cutting loose the next Picasso!
Like these lessons?
Like these lessons so far? Here's an affordable, 1000+ page electronic book that covers all the basic's of drawing and how to draw faces and caricatures in much more depth - and with all sorts of exercises. You can find it at http://www.YouCanDraw.com. |
|
|
|