|
Now let's get a little more detailed
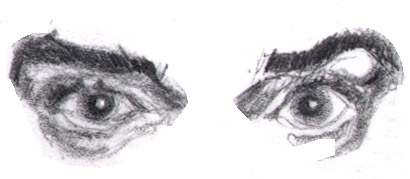
That was pretty simplistic so we'll get a little more detailed now. For instance, on the eye lids, you'll of course also find eye lashes - (usually emphasized less on men, also tend to begin at the outside half of the upper lid most noticeably; on women, the lashes cover 3/4ths or more of the upper lid edge), but you must also be aware of the subtle thickness they possess:
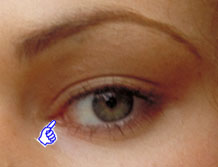
- the lid margins - upper and lower - they have thickness! Subtle but real. You can see them pointed out in this picture - and note how they resemble the rim of your coffee cup:
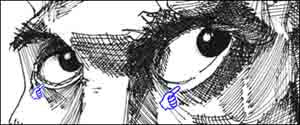
Pointing out the thickness in the eye lids
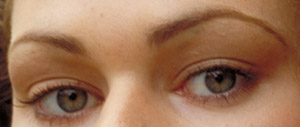
Check out those lashes! - can you also make out the thickness
of the lower eye lids? Look close.
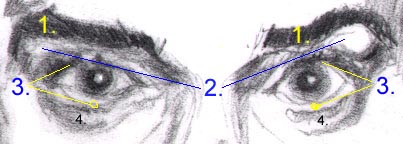
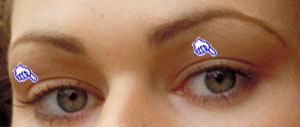
- Medial canthus - the inside corner of the eye (arrows by the nose)
- Lateral canthus - the outside corner of the eye
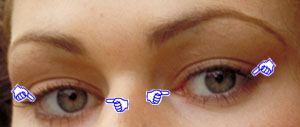
Here you can see the pointers pointing out the inside (medial)
and outside (lateral) corners of the eyes; "Canthus" is
Latin for "corner" - makes sense!
- Axis of the eyes. And it's important to be aware of the corners (or "canthii" - that's plural for canthus), because they point out to you the horizontal "axis of the eyes". What the heck is that? It's the angle of the eyes formed by a line drawn from corner to corner. If you're caricaturing, this can be an important observation. It's this angle:
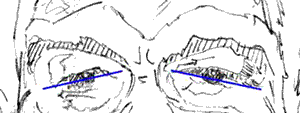
A line drawn from medial canthus to lateral canthus (i.e. corner to
corner) gives you a feeling for the horizontal axis of the eyes
- The caruncula - not real easy to see here but it's that little pink fleshy mound of tissue right at the innermost corner of the medial canthus. It's job is to well, sort of funnel your tears into your nose's "lacrimal canals". (Lacrima means "tears", thus lacrimal canals = tear canals. Which is why some people sneeze when they look at bright lights - all those extra tears running into the lacrimal canals and into the nose cause a little spasm, and voila: you sneeze :-) Let's take a look at it:
The caruncula is the little fleshy pink triangular
tissue it the inside (medial) corner of the eye
- Palpebral folds. The palpebral folds are the lines formed above the upper lids when you open your eyes. Have a friend close their eyes and than slowly open them. You'll see the line form. Within the upper lid there's a fine but stiff piece of cartilage within the lower half of the upper lid. It drags the majority of the soft skin of the upper eye lid up within the fold - it kind if tents it up there - and prevents gravity from pulling the looser skin back down in from of your eye.
As you age, your skin loses a lot of it's bounce, it's elasticity. (Lot's plastic surgery gets done these days to get rid of this sign of aging - and too bad, we need more real "elders" in this day and age! Pardon the editorial.) Incidentally, your lower lid does not move - only the upper lid. Here the palpebral fold is pointed out:
The arrows demonstrate the palpebral folds
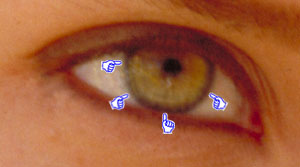
At the center of it all
This is where you're really looking when you look someone "right in the eyes": you're looking at the iris and pupil right through the clear front of the eye - which is of course the clear cornea. Let's break 'em down:
- the cornea - the crystal clear bulge at the front of the eye (in front of the iris)
- the iris - this is the colored part of the eye. If someone has blue, or green, brown or hazel eyes you're referring to the color of the iris. And if you look real close at someone's iris, you can see tiny little squiggly lines that seem to radiate off the pupil like spokes off a wheel. These are actually tiny little muscles that open or close the space in the eye - also known as the pupil...
- the pupil - the space in your eye (actually in the middle of the iris) that acts as a light aperture. It opens and closes as you confront the changing intensity of light while you walk from inside to outside, through night and day, and in out of the different rooms of your home:
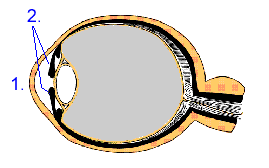
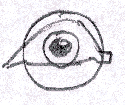
Here you can see how the cornea (1) bulges out at the front
of the eye; the iris is the colored part of the eye (2) behind
the cornea; the pupil is the opening in the iris (the black
circular thing)
Here you see the iris - the colored part of the eye, it lies behind
the bulge of the cornea (this person happens to have one of those
iris's with the "wild black ring" around it's perimeter); the black
pupil in the middle is visible too
- The highlight of the eye is actually light reflected off the cornea (but usually looks like it's right over the pupil) and hence why it's called the "highlight of the cornea" in this next picture. The highlight adds lots of character to the person; the eye also needn't have a highlight at all, like the eye in the picture above. Here's a good example of the eye's highlight:
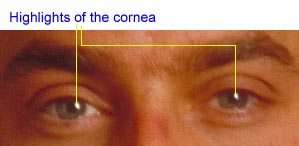
There's some strong light reflection off this pair of eyes - and though
the highlight is reflected off the cornea of the eye, it often
looks as if it's coming right from the pupil
- The white of your eye - the sclera - is actually covered by a clear layer called the "conjunctiva" and if you get "Pink Eye" that's just a viral or sometimes a bacterial infection of the conjunctiva. The conjunctiva covers both the underside of your eyelids and doubles back over the white of your eye. The cornea (the bulging part at the front of your eye) has no conjunctiva - so when you get "pink eye" your cornea is usually spared. But that's more than you need to know for drawing the eye, but it is kind of interesting.
Fun fact: The actual white of the eye is tough tissue beneath the conjunctiva that's actually the underlying support for the whole eye. It's called the "Sclera" and it's akin to the rubber layering beneath the cottony surface of a tennis ball. In fact, it's Greek root, "Skleros" means "hard". And rightly so - it's the hardest part of the actual eyeball. If the white of yours or anyone else's eyes turn yellow, this isn't the best sign in the world. Its called jaundice and means your liver's acting up in a not so great way. Like this guy:
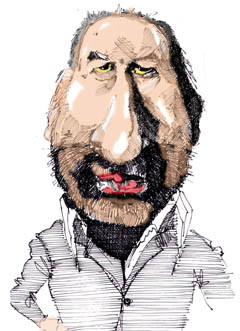
Look closely at the not so healthy eyes on this chap - they're
yellow and that's called jaundice - a sign that your liver isn't
feeling so well (the actual yellow is from a chemical called
"bilirubin" - it's a normal part of the liver's "bile" production)
A backed-up liver spills bile into your blood and is easiest
to see in the white of the eyes
Then we can't forget a few obvious details about the eye itself - it's a globe! A sphere. And it's supported in a bed of fat inside each eyes' respective bony casing within the skull. (The fat's the filler between the eye bulb and the bony casing it fits into. But none of us see any of that. At least I don't want to :-) It rests in it's blubbery habitat much the way this egg sits in the egg holder:
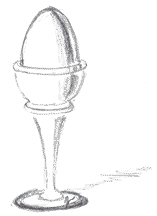
Incidentally, notice how the egg holder curves around the eye - that's much the same way the lower lid cradles the eye.
Lastly, before you go on to try drawing an eye...the eye's observed shape
The overall shape of the eye, the observed part eye, that is as it's exposed between the upper and lower lids - is somewhat almond shaped: (see next picture for the almond shape of the actual eyeball visible between the eyelids)
 |
Demonstrating the almond shape
of the eye as it's exposed between
the outlines of the upper and lower
lids - note the globe of the eye that
exists behind the eyelids |
Major shadow shapes of the eye
Here's a repeat of a picture you saw up above:
Color, highly detailed, close-up of a very attractive women's eyes
It's a rather highly detailed, color photograph. All those fine variations between tones of color add remarkably to the complexity of the picture. And all that complexity can make it tough to decide where you want to start. Reducing that complexity is learning to see as an artist. Learning to see this picture anew as an artist involves one more very learnable step (in addition to the five main skills of drawing you saw in Drawing Basics I and Drawing Basics II )
First, you need to reduce the complexity;
Second, you need to see the main shapes in the photo.
One move accomplishes both: Squint!
How do you 'reduce the complexity"? Simple. You can convert the picture to black and white in PhotoShop (which not everyone has instant access to) or, more easily, you can squint! Yep, squinting will reduce the detail and by cutting off all that light pouring through your pupils on to your retina.
And that has another very interesting effect: it shuts off the cones of your retina. The "cones" of the retina are the nerve cells that detect color. That leaves just the "rods" - the night vision capable nerve cells of the retina - firing off an image to your brain.
This allows you to see all those hundreds and thousands of variations of color collapsed down to just a few. Thus, color and shadow is reduced to shapes. And seeing shapes - be they positive forms or negative background shapes -is a major tool in learning to draw.
Look at what you just accomplished: you learned how to diminish detail, thus making a complicated color picture more manageable, and you learned still more about the anatomy of the eye - all this accomplished with squinting. No expensive computer programs. No artistic feats. By just closing your eyes a little. What a deal!
How might this color photo look after squinting?
By reducing all that detail, you can come up with a picture of the eyes that might look something like the following (this was actually accomplished by converting the color original to grayscale, then using the "cutout" filter, reducing to four colors - all performed in PhotoShop):
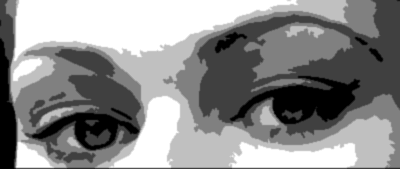
Reducing the multitude of color shades and tones of the original picture to just four
shades of gray - you can accomplish all this by squinting
Now compare that to the original:
The original color picture - notice all the various changing shades of
shadow and color. It makes you almost want to forget about the shading
and concentrate only on the most obvious features like eye brows
eye lashes, the eyeballs etc. Squint at this picture. Squint until you
reach the "aha" that there are shapes within the color shadows that
exactly match the shapes in the grayscale picture above.
Which looks more drawable? No contest: The black and white is definitely more simplified in my opinion. That might not seem absolutely apparent at first, but when you start seeing the shapes in the grayscale picture above as unique and distinct shapes that fit together like puzzle pieces, you'll see that the shapes are as important as the main features of the eyes and thus easier to draw.
Learning to respect and see shadow shapes as being as important as the obvious features will lead to a huge leap in your drawings.
Your turn to draw :-)
And guess what? It's time you get to try drawing an eye or two. I have every confidence you can do it too. And we'll proceed exactly the way you've seen done on other pages (like the Drawing ears page)
Click on this button for a printable (as many times as you like) gridded picture and empty grid for you to get some real practice drawing eyes:
You'll find these two pictures on the pop-up page: the gridded eye - that is you get to draw this picture:
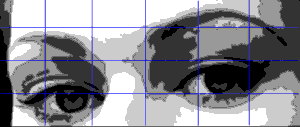
Pre-formatted gridded eye
and a grid like this:

Pre-formatted empty grid for you to draw the eye in
Now if you go to this link, quiz yourself: can you name the palpebral fold, the pupil, the cornea and iris, the upper and lower lids; ask yourself how much of the upper lid has visible eye lashes - as well as the bottom? See, in drawing, observing and knowing what to observe for will improve your drawings to the "nth" degree :-)
http://www.stlukeseye.com/anatomy/Conjunctiva.asp
| Like these lessons? If you'd like all sorts of rehearsal and even more practice at drawing eyes (and just about everything else about drawing faces), and have all sorts of fun doing it, check out this e-book - the most complete guide to drawing faces and caricatures even if you've never drawn before - at www.YouCanDraw.com |
|
|
|