| Caricature and Drawing Newsletter for August / September, 2006
This newsletter is reproduced here by courtesy of YouCanDraw.com -
Once and for all getting you drawing faces and caricatures:
August / September 2006
Back to the Archives
||||||||||||||||||||||||||||||||||||||||||||||||||||||||||||||||||||||||||||||||||||||||||||||||||||||||||||||||||||||||||||||||||||||||||||||||||||||||||||||||||||||||||||
Your August / September 2006 YouCanDraw.com Communiqué
||||||||||||||||||||||||||||||||||||||||||||||||||||||||||||||||||||||||||||||||||||||||||||||||||||||||||||||||||||||||||||||||||||||||||||||||||||||||||||||||||||||||||||

Howdy all,
OK ya'll, it's been a while. Took a long needed break. In fact so long I found it pretty hard to get back in front of the computer. After 8 years I guess that's understandable. I do however have to reiterate something I said in an e-mail - and later posted at the sales page - that ezines will occasionally be "gappy". After doing the drawing for today's though, I had so much fun I want to keep doing them! But I know how things will pile up again.
So here's the deal: I've got a couple other irons in the fire that are starting to require more and more attention and there's only one of me. It's possible I may discontinue regular ezines - but not before I do my best to fulfill the obligation those of you whom just signed up saw advertised (I'm allowed a few every-other-month issues though :-). If things get too wild and I just can't get the 'zines out then they're going to be late. I apologize ahead of time. I truly do want to see you learn to draw and learn to draw caricatures.
Time for a blog?
Yep, I'm looking at using the blog format in place of ezines and if that's the case, I sure want to talk about more than drawing. It may work out that I'll be doing both - but the blog will go well beyond just doing caricatures. What I've discovered is that the majority of you are multitalented, multitasking, multifaceted artists, writers, painters, singers, poets, actors - along with having a "day time" profession. Pretty cool group! So I think we all have more in common than you might think. I'll keep you posted.about that :-).
On to today's topic...
Getting back to the basics: Modified Pure Contour in gesture and in a caricature: Making the case drawing Japan's Prime minister
What's that? Back up a step: what's Pure Contour drawing? Well, it's the kind of drawing your drawing teacher probably had you do - and in retrospect seems like most drawing teachers had you do and never knew why they had you do it. In it's purest form it's letting your hand draw what your eye is observing - as you observe it. Start slow, speed up a little. AND your pencil-holdin' hand never leaves the paper. AND your eyes never looks at what you're drawing on the paper - they stay focused on the object being drawn.
The results are 1) your brain really gets into your subject. (And in to it's "right side"). And 2) your drawing looks very organic. Rich even. Review this stuff - (pure contour drawing) if that's not sounding familiar:
In Modified Pure Contour you do all the above BUT you get to look at your drawing. The greatest advantage of that (getting to see what you're drawing), is getting proportion into the picture while you maintain that "organic lookin" pure contour result. And you STILL don't lift your pen off the paper.
You squint to collapse detail into manageable shapes. You squint to see the shapes of shadows and highlights and you record the lines and edges you observe.
Review the following:
In the following group of drawings I was using only a plain old blue ink Paper Mate "Flex Grip" pen (yes pen) and cheap old newsprint for paper. I challenge you to do the same: use a pen. You can't erase and you're not to worry about getting it perfect. This is a great opportunity to just dive in and not be afraid. Your goal is to try some drawings (copy these drawings!) using this method.
One more word - you may need to proceed with caution
You're about to see a couple (well three) rapid fire gesture drawings. Drawing the human form is always fascinating, (I like it as much as I enjoy caricatures). It's the perfect subject for using modified pure contour. Just wanted to warn you ahead of time: gesture models generally don't wear a bunch of clothes. Keep your eyes covered if you're easily offended by such stuff. As you scroll by of course...
OK here we go. These first five are actually drawing assignments right out of a Charles Reid painting book (coincidentally on Painting The Human Form) :
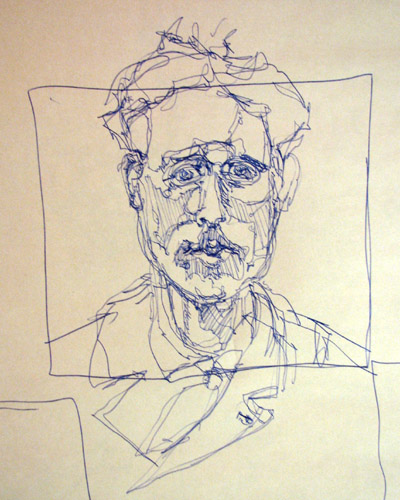
I pretty much drew a bounding rectangle before starting any of the drawings. My favorite part of the picture above are the lines between the forehead, the hair, and the glasses. Can you follow the lines from glasses across forehead to hair? I also like how the mouth / lips turned out.
How does it compare to the original photo? So so. There's a family resemblance - but that wasn't my goal (that's why you see no original photo here :-) I did a second drawing below - any closer? I don't know. Doesn't matter. Let me say this again: the pen never left the paper but I did look back and forth from subject to [paper to get the proportion right.
Drawing number two:

These are fairly rapid fire drawings - but make sure you start very slow at the beginning. Don't draw any faster than your eye moves over a line, an edge, or an angle. (See the pure contour assignments to learn this.)
Gesture drawing #1
Look at how that foot comes out at you! That's my favorite part of the drawing. Note how the width of the foot compares to the height of the head - do a sighting. Have you convinced yourself the foot is both taller and wider than the visible part of the head? And talk about loose, spontaneous lines! That not great skill - that's just letting go, not worrying about getting anything perfect and letting your hand record what your eyes see. You can learn this too!
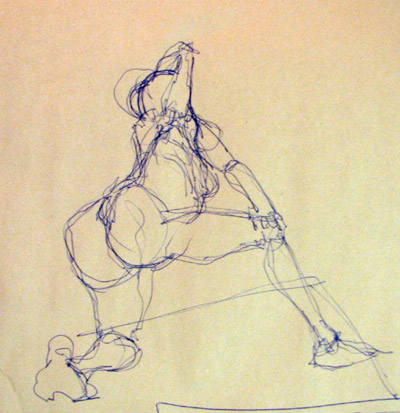
Gesture drawing #2
I'm thinking I'm going to draw this one up large and do a painting of this next drawing. I just really like the flow of it, the shapes, the repeated lines around most of the distinct body parts. Where the feet crisscross and where the arm reaches around the back - those two areas are my favorite parts of the drawing (it's about 14 inches tall):

When your eyes stay on your drawing subject and your hand bit-by-bit records what your eyes see, and your head stays out of the way, (that is, you don't think about how good what you draw looks, you don't worry about looking bad, when your brain only acts as a copper conductor between what your eyes see and what your hand records), it's amazing to me how simple yet how graceful and fresh the lines always turn out in these kinds of drawings.
Gesture drawing #3
In this next drawing the head got a little out of proportion. I'm not going to worry about it though.(Plus it looks like she's wearing a boxers helmet...theres actually two heads there :-). The shadowed area on the lower abdomen and the inside of the models leg work for me - it gives the form weight and depth.
There's also a nice angle drawn across the shoulders going from left to right. Compare that to horizontal. In fact, try to draw that angle made between shoulders and the top horizontal line of the bounding rectangle on a separate piece of paper:

...And check out that ankle and foot on the left side of the picture - that's pretty nice! :-) How long is the torso compared to each leg? 1/2? 3/4's the length? Do a sighting! Prove it to yourself. What's a sighting? See this sighting animation to review it. You could also open up the search function in your sourcebook and type in "sighting" and see a ton of references there.
The Caricature
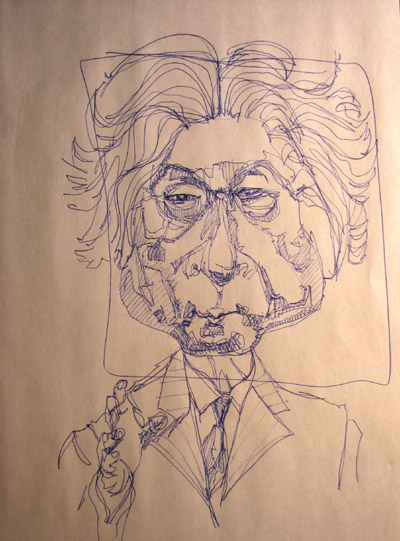
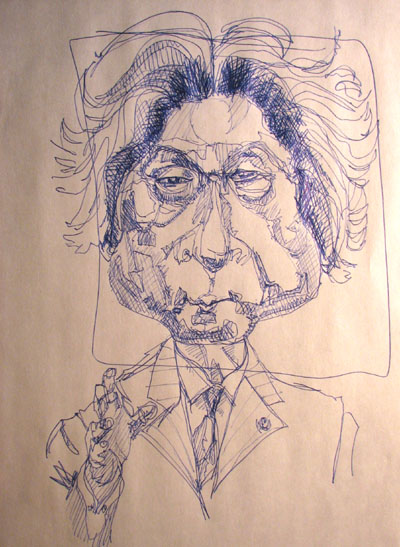
OK. Here's this issues caricature subject: Junichiro Koizumi
We're going to go through this pretty fast but here's the main points I want you to keep in mind as we go:
What makes him caricaturable?
Squint! Find the main shadows and highlight shapes.
Squint and isolate the main features.
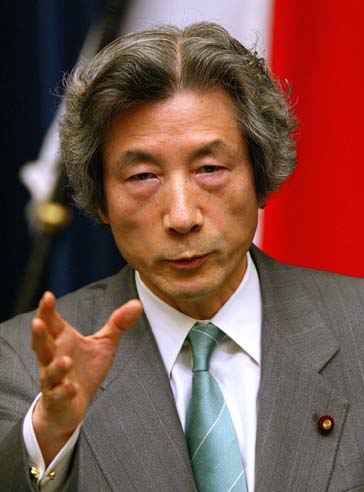
So what makes Mr. Koizumi caricaturable? Well the hair is pretty big :-)
Lets hit on the eyes: Notice the alternating light - dark - light - dark - light - dark areas around the eyes going from top to bottom. Also note how parallel the upper and lower lids are. People of Asian descent have extra skin at the inside corners of the eyes (at the medial canthii - that's plural for "canthus" - which is Latin for corner). No need to draw stereotypes - just draw what you see.
Where did I start?
I started drawing at the eyes - though I took no photos until I was well along. I drew the one on the left side first (in fact you can see the very beginning of the first line on the upper eye lid on the left - see it?). Notice how the lines are of the pure contour technique: you won't see many isolated lines since I really tried to keep the pen on paper the entire time. (Exception: some of the shadows were crosshatched.)

Once done with the eyes, I moved along to the shadow shapes of the upper lids, then the lower lids defocusing my eyes to gauge the rough proportions. Then off to the nose. Mr. Prime Minister's nose is actually kind of long - but I didn't want to go too crazy because of the large space between the bottom of the nose and the mouth and the relatively small space between the lips and the bottom of the chin. Review the horizontal landmarks in any of the case studies or see the Lesson 15 Flash lesson number one here (there's three different links there :-)
Here's a close-up of the eyes. Can you see the highlights in the pupils? Squint your eyes and see if the shadow shapes around the eyes are roughly the same shape as in the real photo.

OK. Overall proportions of the face: He's a handsome man! He's got the strong athletic looking jaw and strong wide cheekbones. Chalk up those two as things to exaggerate. Check out the light space of the apron-of-the-upper-ip and compare that to the highlight shape across the chin. Notice how the apron of the upper lip is proportionately about two times as big? In the Mr. Average model the bottom-of-the-nose line, the line-between-the-lips-line, the top-of-the-chin line and the bottom-of-the-chin line all mark off equal sections. Here can you see the difference?
OK, next pic: filling out the jaw line, outlining the subtle shadow shapes in the cheeks and chin - and filling in those shapes. Also notice the exaggerated chin width.

Here's a close-up:

Keep looking at the picture above: look closely at the shape of the upper lip and "Cupid's Bow" - that's the little down-pointing middle part of the upper lip Mr. K's is proportionately small. Look until you can differentiate those shapes of the white of the skin and the red of the lips. Also note the subtle chin shadow.
Compare this and the drawing above.
OK! The hair: My eyes are running over the shapes within the shapes in that that big shock of hair Mr. Koizumi is sporting:

See if you can't relate the shapes of the hair sections in this drawing with the actual shapes the photo. I've also begun adding the neck, the shirt collar, tie, lapels, and the right hand. Look close at the right hand and notice again: the continuous pure contour lines. Also notice the extra layer of hatches over the cheeks.
...Another look at the photo before we wrap this up:
Yep, need more shadowing in that hair, more shadowing in the hand, the neck, under the collar: compare those shadows in the picture below and in both the previous pictures above...
...hmmm...something I left out...

No I'm not drawing cat whiskers but I see a subtle shadow shape that I missed when I drew this picture. Can you see it? Look at the picture below and compare. Squint until you see the subtle shadow between those rows of yellow lines. Our Prime Minister friend picture shows off shadows formed by some of the very delicate facial muscles just under the skin. Intermediate / advanced level question: what's the name of this muscle?
Answer: click on the next link to see an anatomy illustration. See if you can find the muscle yourself before you scroll down to the answer just below.
Click on this link:
http://ycdinsiders.digitalchainsaw.com/InsidersArtistLoft/cheek_muscles.htm
OK, did you really click on the link? Nooo!? Go look! :-) Did you say "Zygomaticus Major or Minor"? Dang you good! :-) The muscle outlined on the Prime Minister's right side of the face (the area highlighted on the photos left side) is probably the zygomaticus minor. The other side is probably the zygomaticus major. Cool huh?
Can you find those same muscles in the picture at this next link? (Hint it's on the left side of the picture) - the next link:
http://ycdinsiders.digitalchainsaw.com/InsidersArtistLoft/ani_lips_and_bones.htm
Cool! I have to say, I think I'm going into a phase where I'm going to use the contour-keep-your-pencil-on-the-paper-at-all-times approach. It really is a pleasure as you drop into those less used parts of your brain. Not to mention the really unique, fresh, and so interesting lines!
The Honorable Prime Minister Junichiro Koizumi
Assignment: take your time going through this page. Try to see and preferably draw the picture using the contour approach. Review the reference pages if something sounds unfamiliar.
Dive back in and don't be afraid! :-)
Warmly,
Jeff
Kasbohm & Company's
Drawing-Faces-and-Caricatures-Made-Easy.com
and
YouCanDraw.com
© Copyright, All rights reserved 1997-2006
|